Optimal can
25.4.2
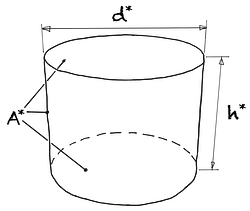
Fig. 1
Optimal container with base and lid
d* Optimum diameter h* Optimum height A* Optimum area Eqn. 1
Eqn. 2
Eqn. 3
Eqn. 4
| Optimal diameter | d* | = | mm | ||
| Optimal height | h* | = | mm | ||
| Optimal area | A* | = | mm2 | ||
| Height | href | = | mm | ||
| Surface | Aref | = | mm2 | ||
| Percent loss | q | = | % |
| Volume | Vi | = | L | |||
| Diameter | dref | = | mm |
Calc 1
Example 1 An optimal can with a beverage content of 0.9 l has an optimal diameter of 131 mm and a height of 66 mm. If the can diameter of a reference can is 100 mm instead, this results in a height of 115 mm with the same volume. The area loss of the reference can is -6.6%.
Example 2 A beer barrel with a capacity of 50 l has an optimal diameter of 503 mm and a height of 252 mm. If the reference diameter is 360 mm instead, this results in a height of 491 mm with the same volume. The barrel area loss is then -9.3%.